Some people trim videos for personal purposes, while others do it for entertainment purposes. Whatever the reason is, video trimming is of great importance for them. For digital marketers, video producers and YouTuber, trimming is particularly important when it comes to ensuring that the video starts fast without losing the attention of the audience. It is because the first five seconds of your video can draw the attention of your viewers. Thus, it is good for user engagement.

Cutting video is also significant in daily life. For instance, you can trim an important clip from a large educational video and add it to the presentation that you are going to deliver the next day in college. Likewise, you can separate short clips from a big video file to share on social platforms.
In today’s article, you will learn how to trim video on Windows and Mac computer without losing quality. Read on!
#1 Gihosoft Video Joiner & Cutter: Trim Video Without Losing Quality
Gihosoft Video Joiner & Cutter is a lightweight two-in-one video editing tool, which specializes in helping users join multiple videos into a large file and trim video on Windows 10 and Mac without losing quality.
Some of the best things of this Joiner & Cutter are that it will cut video with faster processing speed and save the edited video in the same file format so that the quality is maintained. Gihosoft supports processing videos in all popular formats including FLV, AVI, MP4, MOV and more.
Here are the steps to quickly cut video using this trim video app for PC.
- Step 1. The first step is to download and install this tool. After that, run the program.
- Step 2. Then you need to import your video file that you want to trim. Just simply click on the “Add Files” to add a video file.
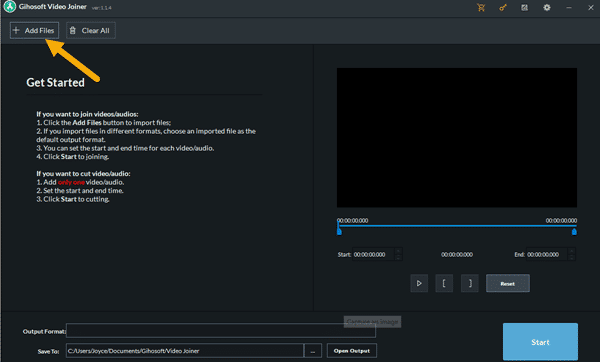
- Step 3. Once you have loaded the video file, set the start point and end point for trimming. The two sliders allow you to set the start and end time accurately. Also, you can manually enter the start and end times.
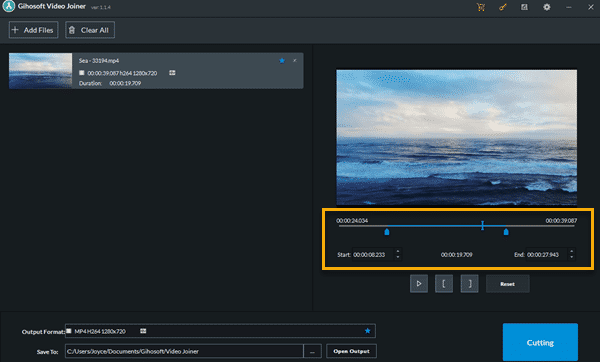
- Step 4. Double-check the video file’s start and end time. When everything is okay, you need to proceed by clicking on the “Start” button. Once the process is completed, you can access the trimmed clips by clicking on the “Open Output” button in the pop-up window.
#2 Movavi Video Editor: Quickly Cut Video
Movavi is a comprehensive video editing software for PC and Mac, which enables users to edit videos in a professional way. This program is also good for basic video editing such as video trimming. It enables you to split and trim videos in any video formats like AVI, MP4, FLV, and etc.
Here are the steps to cut or trim videos using the Movavi Video Editor:
- Step 1. Download and run the program on your computer. Then just click on the “Add media files” button to add your desired video.
- Step 2. After that, you will see the video on the timeline. The red marker on the timeline allows you to move and pinpoint the exact spot that you want to trim your video. When you find the exact splitting point, just click on the “Split” button.
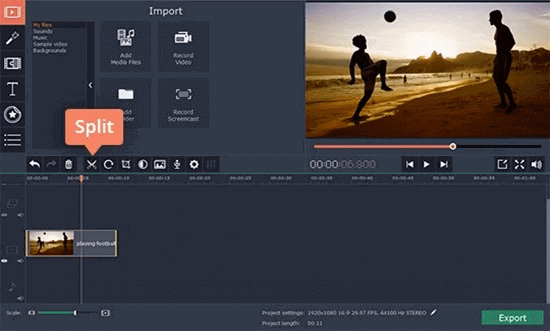
- Step 3. Next, you need to delete the unwanted section of the video by selecting it and hitting the “Delete” button on your keyboard.
- Step 4. Finally, click the “Export” button to save the trimmed video clip.
#3 How to Trim Video in VLC Media Player
The biggest advantage of using VLC to cut videos is that you don’t have to download and install extra software on your computer if you have already had VLC on your device. VLC Media Player already offers the simple solution for you to trim videos. Actually, VLC can’t cut a video directly, but you can use its Record feature to capture a certain part from the video. However, one of its biggest drawbacks is that it won’t let you preview or check the trimmed video before saving.
Let’s see how to trim video in VLC Media Player with its Record feature:
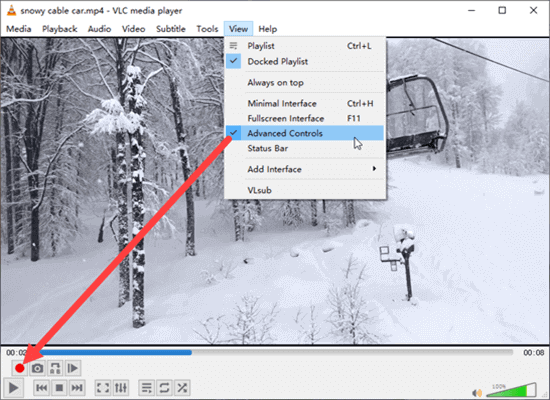
- Step 1. Open the VLC Media Player and enable the Advanced Controls feature. To do this, you should navigate to View > Advanced Controls. After that, you can find the Record button and three more control buttons appear below the progress bar.
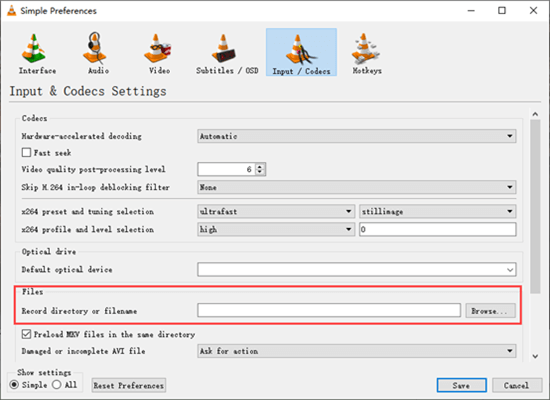
- Step 2. In case you couldn’t find the generated recording files, you have to choose where to save them by going to the Tools menu > Preferences > Input/Codecs > Files > Record directory or filenames. Although this step is not mandatory, it will save you time for the future.
- Step 3. The next step is to add your video to the VLC Media Player by using the drag & drop option.
- Step 4. Next, drag the slider to the point where you want to start trimming the video. Then click on the Record and Play buttons to initiate the video cutting process.
- Step 5. Once the video is played to the point where you want to end, click on the Record button again to finish the cutting process. Then the recording will be saved automatically.
Conclusion
Wrapping up, video trimming is essential for video editors, visual content producers, and digital marketers. It is also beneficial for personal use – e.g. trimming your wedding video to remove the unwanted sections like watermark from the video.
Lastly, there are many video editors that you can use for trimming purposes. When it comes to trim videos on Windows and Mac computer without losing quality, the aforementioned tools are reliable and easy-to-use. Good Luck!
source https://www.gihosoft.com/video-tips/how-to-trim-videos.html