Hello. I accidentally deleted a folder with hundreds of pictures from my Sony flash drive. I checked the Recycle Bin immediately but there was none of the pictures I just deleted. How can I retrieve deleted photos from a flash drive for free? I heard that it is possible to undelete lost files without software but don’t know how.
USB flash drive is one of the most commonly used storage devices, especially for file transfer between computers. However, data losing from flash drive has happened to a lot of business owners, students and other people due to various reasons, which could cause further loss of time and money. In this article, we are going to talk about how to recover deleted files from flash drive. The solutions will help you recover deleted photos from SD card, flash drive and hard drive for free with or without software.
Part 1. Where Do Deleted Items from Flash Drive Go?
To answer this question, we need to know what happens when you delete a file. When you deleted a photo or video from a removable disk, like USB flash drive or SD card, or emptied your Recycle bin & Trash, the system only removed the master file table reference, which recorded the location of the where. The system is told that the file is removed so that new files can be stored to the space previously occupied by the deleted one. However, the deleted file is still there waiting for being overwritten.
To put it simply, as long as the deleted files are not yet being overwritten, it is possible to restore files from flash drive either completely or partially (because every new file could overwrite the data you need in a random order).
Part 2. How Can I Restore Deleted Files from Flash Drive?
The first thing you should do is stop using the flash drive when you’re aware of the fact. Safe remove the USB drive from your computer or other devices, then keep it somewhere secure. After that, you need to pick out a good flash drive recovery software, which is able to scan the storage device for deleted data pieces and rebuild the file table so that you could get the wanted files back.
Things will be much easier and worry-free by applying flash drive file recovery with a professional software. It will show you which files can be retrieved and which are impossible, with no risk of destroying the missing data. It would be surely better to have a tool that can recover deleted photos from flash drive 100% free, or even other file types if possible.
Part 3. How to Recover Deleted Photos from Flash Drive 100% Free
Here we have a data recovery software allowing free recovery of image files. RePicvid Data Recovery has helped thousands of users recover all kinds of files from various storage devices, including USB flash drive, SD card, and internal/external hard drive. It covers a wide range of over 150 types of files, from photos to videos, Office documents to PDF, compressed files to other common data.
Support over 150 types of files, including photos, videos, documents, audio and more.
Full and free preview before recovery.
Multiple filtering options to ensure fast and accurate data recovery.
Highest recovery rate with original quality.
Easy 3-step recovery. No technique required.
Steps to Recover Deleted Files from Flash Drive
Free download RePicvid Data Recovery on your Windows or Mac computer, then connect your flash drive to the computer and follow the steps below.
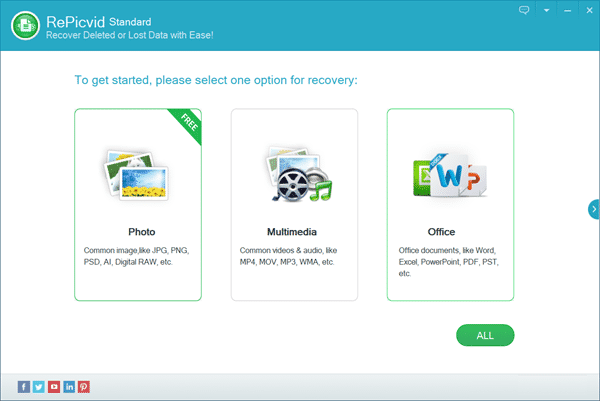
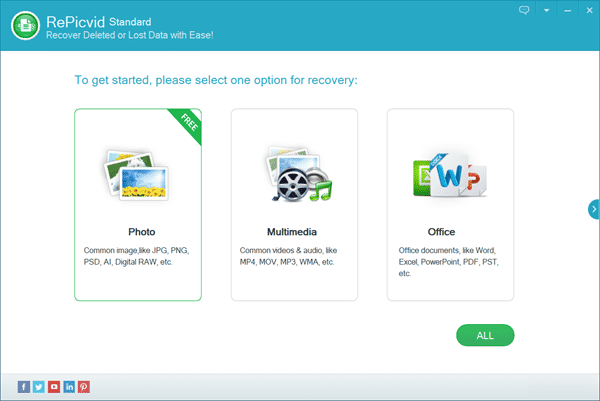
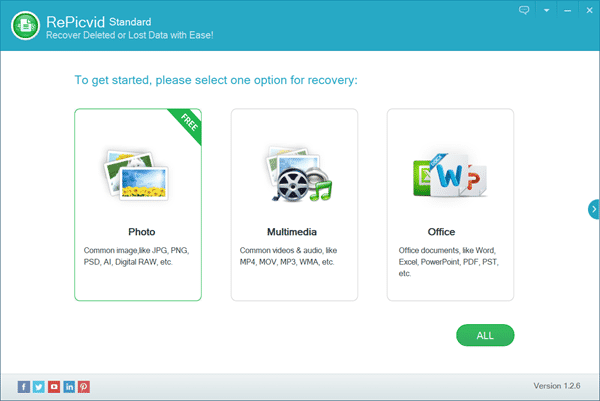
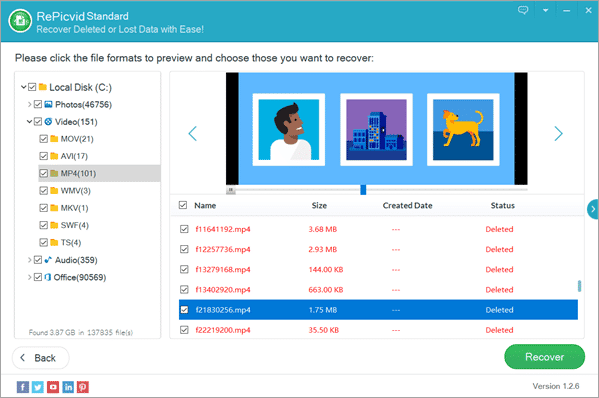
Step 1. Run RePicvid and Choose a Recovery Mode
Launch the program and choose a Recovery mode from all of a total of three options (Photo/Multimedia/Office) and the All button. You can check the sample file formats on the three sections. Click any of the four options to continue.
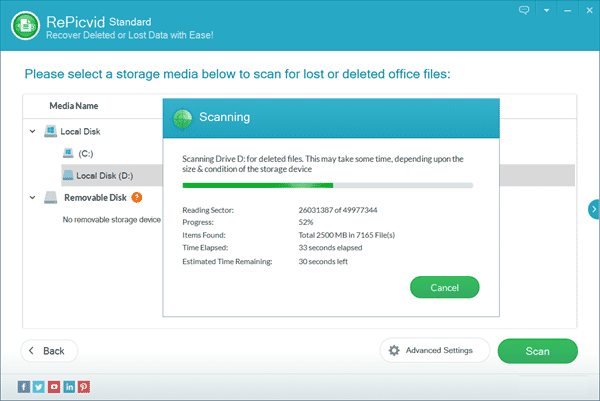
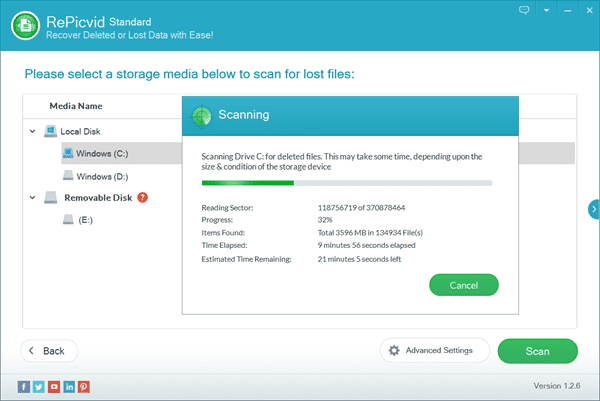
Step 2. Select a Partition to Scan for Lost Files
Check all the detected disk drives, including the internal and external hard drives and connected removable disks. Select the flash drive where your files were deleted, then click Scan button to proceed.
Tips: You can also click Advanced Settings to specify the file formats you want to recover.
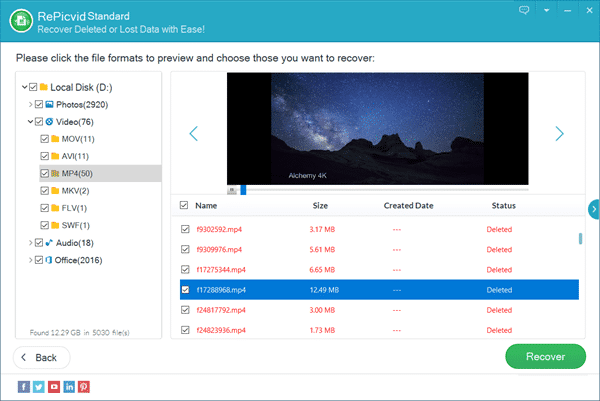
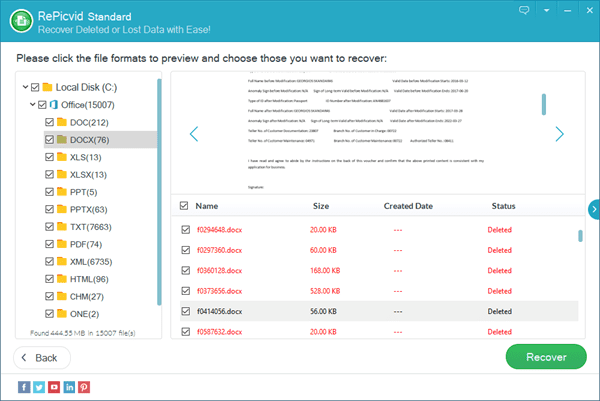
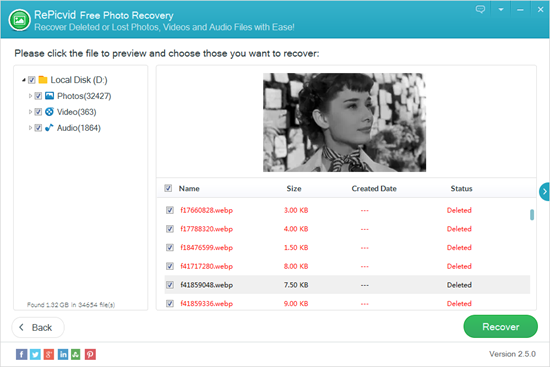
Step 3. Preview and Recover Flash Drive Files
Once the scanning is completed, you can click the file types on the left pane and preview the found files on the right so that you know what you will recover. Check only the files you need, then click Recover button to recover deleted files from flash drive.
Note: If you want to undelete photos from flash drive 100% free, please choose Photo section at the first step.
Part 4. How to Recover Deleted Files without Software (Using CMD)
Many people have heard that it is possible to recover deleted files using Command Prompt, which is a built-in utility in Windows computers. However, Command Prompt may not work as magically as you expected.
Step 1. Click the Start menu, type CMD, then right-click on Command Prompt and choose to run it as administrator.
Step 2. In Command Prompt, type chkdsk D: /f and hit Enter (replace D with the drive letter of the storage device where your photos were lost).
Step 3. Type Y and hit Enter to proceed if the command lines do not start.
Step 4. Type the drive letter again and hit Enter.
Step 5. Type attrib -h -r -s /s /d drive letter:\*.* and hit Enter. For example, attrib -h -r -s /s /d D:\*.*
The files will be recovered in a new folder on the storage device.
What has happened after applying the command? The chkdsk command has fixed the possible errors on the selected drive, while the attrib command specifies the file types to be recovered from the computer with the following attributes:
-r is to recover read-only files
-s is to recover system files
– h is to recover hidden files
/s is to recover subfolders
/d is to include process folders
The CMD utility is usually helpful only for system glitches. What’s more, make sure you know what you’re doing, because you might mess everything up if the commands are executed wrongly.
Bottom Line
In this tutorial, we introduced two solutions for flash drive file recovery. The flash drive recovery software works great when you lost precious files due to accidental deletion, formatting or other unknown errors without valid backup. Nevertheless, you may need to fix corrupted pen drive first in case your computer doesn’t recognize the device. Feel free to let us know your thoughts in the comment.
I have an SD card for my digital camera but somehow it refuses to be read now. I can access the card memory but not the stored files. I have tested the corrupted SD card on another camera, an old phone and my PC, and all failed to work, so the devices should not be faulty. Can I recover data from corrupted SD card without formatting?
With its advantages in portability and affordability, various kinds of SD cards, like SDHC, SDXC and microSD, are widely used in Android phones, digital cameras, drones, and many more electronic devices. However, SD card is not as secure as people expect. In many cases, the tiny memory card can get corrupted and inaccessible, so hundreds of users are suffering the pain of losing precious photos, videos and documents every day. In this tutorial, we are going to talk about how to fix corrupted SD card and recover data from it without formatting.
It is not possible to name all causes and solutions for SD card corruption error, and it will take you a long time to try every solution one by one. Therefore, you’re suggested to check the troubleshooting tips below in order to identify the exact problem and solve with small tricks.
Gihosoft RePicvid is the best free data recovery software to recover photos, videos, audio, Office documents and more from SD card, USB flash stick, external hard drive and other storage devices. Please use RePicvid to scan your SD card for the missing files as soon as possible.
All the solutions require your corrupted SD card to be connected to a Windows computer through the card slot or a card reader. It is suggested to remove all other external disks to avoid data loss due to mistaken operation.
Method 1. Fix Corrupted SD Card with CHKDSK Command
CHKDSK is a useful command for fixing common errors on removable disks, like SD card and USB drive. The command will start an automatic process to check and fix any possible errors on the corrupted SD card so that you can use it as normal.
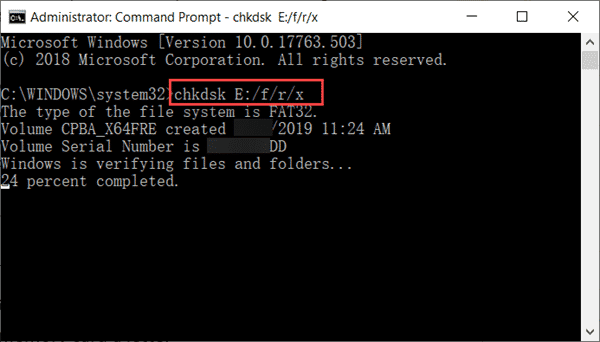
Step 1. Click Start, type CMD, right click Command Prompt, then choose Run as administrator.
Step 2. In Command Prompt window, type chkdsk E: /f /r /x and hit Enter.
Step 3. Wait the process to complete.
Note: E is the drive letter of the corrupted SD card. You can find it in Windows File Explorer under Computer > Devices with Removable Storage.
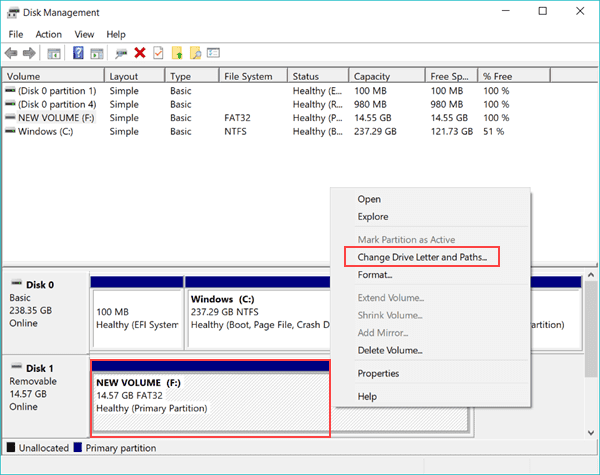
Method 2. Assign a Drive Letter to the Corrupted SD Card
If your SD card is not readable and not even showing up in Windows File Explorer, then Method 1 may not work. In this case, you need to assign a new drive letter to the unreadable memory card.
Step 1. Press Windows + R shortcut, type diskmgmt.msc and hit Enter.
Step 2. In Disk Management, locate the corrupted SD card, right click on it and choose Change Drive Letter and Paths…
Step 3. Click Change…, then enter an unused letter to the drive.
You may need to restart your computer to apply the change and make your corrupted SD card readable again.
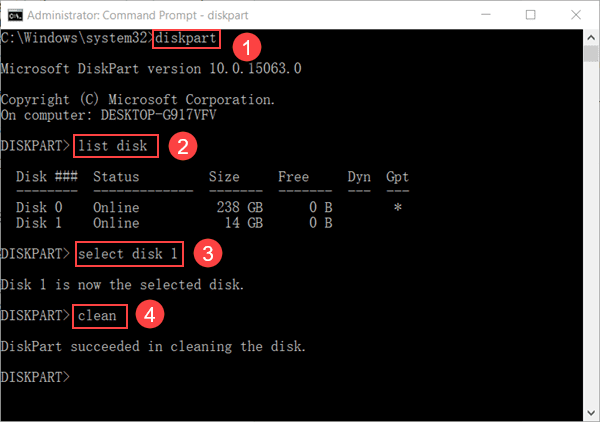
Method 3. Fix Corrupted SD Card with DISKPART Command
Similar to CHKDSK, DISKPART is another command to recover the corrupted SD card. It is actually more powerful than CHKDSK, but the SD card will be reset, and the data will be cleaned. That’s why we list this method as the last resort. Nevertheless, you can still try the SD card recovery software to recover photos & videos from SD card after the formatting, though the chance may be smaller.
Step 1. Run Command Prompt as administrator as described in Method 1.
Step 2. In Command Prompt, type the commands as below one by one: diskpart list disk select disk # (# is the letter of the corrupted SD card)
Step 3. Click Start menu, type create and format disk partitions and open it.
Step 4. Locate the disk of your SD card which should be labelled as Unallocated.
Step 5. Right click on the disk and choose New Simple Volume…
Step 6. Follow the wizard to complete the creation. Your SD card data will be wiped during the process.
Tips to Avoid Losing Data on Your SD Card:
Don’t remove your SD card when your camera is on.
Always buy genuine SD cards from qualified manufacturers, like SanDisk, Kingston, Samsung, etc.
Always transfer data with Copy and Paste instead of Cut and Paste.
Final Thought
Hopefully, your corrupted SD card is now working normally again. If not, please describe the case in detail in the comment section. We will try our best to give proper advices to fix your corrupted memory card on Android, camera or PC and restore the lost data.
Just like free fonts for commercial use, people download thousands of photos online, some of which are completely free while others royalty-free. As you may know, there are a lot of benefits to buy stock photos through online photography agencies, but some people do not understand how they work or even what they are. Don’t worry. In this article, you will learn what royalty-free means, the benefits of using royalty-free images as well as the top 10 software for royalty-free images in 2022.
Some of benefits of using royalty-free images are as follows:
Some stock photos are used legally because they comply with international copyright law that helps you to have complete ownership over your work and your final product.
Your stock images can be used for designs, various multiple promotional campaigns and also share them with the world through digital media.
These are extremely cheap and very fast to use.
It saves money and also consumes very less amount of time.
You can search for international stock photos quickly, find the perfect one for you and make use of it without any additional costs.
Many benefits can be received from the free memberships that most of these stock agencies provide to the users during their time with the software.
A Royalty-free license is not something that can be given out on an exclusive basis. Many users even today think the term ‘royalty free’ means that the photos on their stock somehow become free, but the use of the word ‘free’ here does not refer to the price. If you want your photos to be royalty free, then it means that this presents the purchaser with certain user rights such as the place where a photo can be used, and under which conditions you can use them and this is liable on which products. So you no longer have to depend upon anything or anybody else when you are looking to get licensed because Royalty Free Image software has your back. Make use of the 10 best royalty-free software to edit your photos today.
Top 10 Royalty Free Image Software with Bonus Tools
Photo editing and creating art software has become a wide field today and especially in this age of technology and innovation. There are so many software available today for the people working in the photography industry, so it has become almost impossible to choose which one is the best. Below are 10 of the best Royalty Free Image Software for photos and images with clear details so that you can get a careful understanding of what you want and how you want to do it.
Adobe Photoshop is one of the most frequently used software to combine and mix several images and remove any unwanted objects from the image. The basic features it offers include perspective correction, channel mixing and clone stamp tool. Adobe Photoshop is one of the best graphic design software for beginners and you can create royalty free images with ease using the various tools available.
Key Features:
Cropping, straightening, rotating and flipping.
Blemish Removal
One touch adjustment
One-Touch filter with 20 attractive effects
Slide controls to improve the colour of the image
Image Rendering
Borders
Allows sharing on social media sites
Supports RAW format
Some of the advantages of Adobe Photoshop includes- effective crop tool and smooth video editing. The disadvantages might be the subscription fee and the time cost to become a master of Photoshop.
GIMP or abbreviation for GNU Image Manipulation Program is probably the best alternative to Adobe Photoshop for its bright UI and easy-to-use operation. Known as the ideal software for graphic designers and photographers, its photo manipulation feature makes it an ideal match for a royalty free image software. This software provides the users with all the necessary tools that are needed for manipulation of high quality images. From tools for retouching to restoring and even to creative composites, the users can find almost anything they need using the GIMP software for Windows that also makes their work Royalty Free Images. Using GIMP, only limitation you may ever find is your imagination.
Key Features:
It is highly flexible and easy to use
Customisable interface which includes a full-screen mode to view and edit simultaneously
Adobe Illustrator is one of the best tools used today to make use of vector art in a way towards the creation of icons, logos, sketches, typography or even various complex illustrations for making videos. There are some basic tools that are available on the Illustrator which are selection tools, pen and pencil tools, paintbrush tools, etc. For example, the Selection tools are used in the design layout to adjust and carefully organize the work of art by selecting, positioning, and stacking the object accurately according to the user’s choice of position. Moreover, these selection tools in Illustrator can also group, lock or hide, and measure objects.
Key Features:
Artworks can be created smoothly using illustrator with a seamless alignment
Plugins that help in the making of an exciting web page.
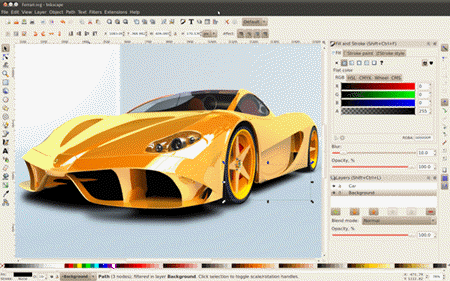
If you are looking for a professional images software that is perfect for graphic designing and for the drawing of vector arts in the SVG format, then Inkscape must be your choice. Inkscape is the perfect tool for experiencing royalty free image creation. It can be used for sketching, colouring or making illustrations. With its Ghost script extension, it is very easy for the user to read eps files comfortably.
Key Features:
It is free and open-source
Availability to move screen pixels
Easy editing of clones on the canvas
Editing of gradients made possible
Fill paint-bucket with one click
Among the various advantages of Inkscape, the most exciting is that it is free to use and has many filters although it tends to be a little slow while in use.
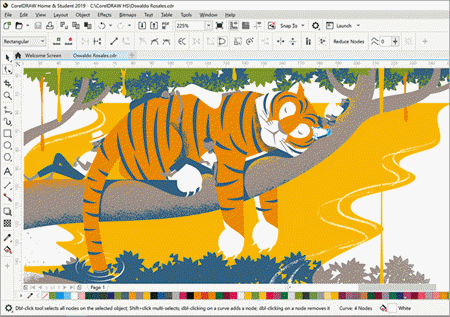
If you are looking for a popular vector graphics editor, then CorelDraw must be your go-to software. With its amazing and highly productive functions, CorelDraw allows you to have full control of your work so that you can obtain dynamic results.
Key Features:
This software works smoothly with large files that are stored or saved in the Corel Photo-Paint.
It also supports apps like the Duplexing wizard, Barcode wizard, Bitstream Font Navigator, etc.
You can produce various wonderful works with CorelDraw. On the dark side, however, since this software is difficult to use, beginners take some time to use it.
The ideal software for creating and sing layout design for various purposes is the Adobe InDesign. This software can be used by those people who work with online magazines, printed books, brochures or digital magazines and that too with the ability to create royalty free image.
Key Features:
InDesign has great flexibility that enables one to easily drag and drop isolated layers
Images can be easily resized
The combined use of it with the Adobe Creative Sync, you can complete even the most complex work efficiently and quickly
Get the latest updates and features by becoming a member
Affinity Designer produced by Serif is a graphic design software that can be used for creating royalty free image, photo designing and editing. It has great illustrative features such as those that help beginners to learn their way towards complex work, it has an extremely low learning curve that makes it easy for graphic designers from beginners to professionals to use it thoroughly and lastly, it enables use of 3D animations and adding effects to different images and to create vector illustrations.
Key Features:
The software enables users to create a customisable workspace of their choice to allow full control over their work
It provides an extensive support option that allows users to share their work via social media platforms like Twitter, Facebook and the like
It lacks a few photo effect features, such as Panorama merging, HDR imaging, etc.
Xara Xtreme is a royalty free image software that provides users with a wide variety of photo design options and features along with wide range of illustration tools that the users can use to create, edit and almost everything they want on their images or videos.
Key Features:
Great quality of the features and work options that are available on the software, giving your work the best kind of finished look you would want
Users can now manoeuvre and combine different colours and textures on the images. They can also make use of the option to remove any distortion that may be caused by the lens in any way
Responsive system and team to address the issues of its users and provides almost instant solutions for the same, thus making sure it can remain updated and maintain expected results for all
Corel PaintShop is a professional photo editor that was imagined and brought into the world by the passionate photo enthusiasts who aim at bringing the best of the software in front of the world. PaintShop Pro is another one of the most affordable, user-centric alternative to Adobe Photoshop that looks forward to awe users with every new feature inspired by the users’ ideas themselves. You can now create and edit compelling compositions and impactful design projects with the help of complete sets of professional image editing tools available right here on PaintShop Pro 2019. Experience faster and more robust software to create magic that is even easier to use and more creative than all of its previous versions.
Key Features:
Easy management of photo
Availability of high grade professional tools that can be used efficiently by both newbies and professionals
Availability of short and easily understandable video tutorials and other forms of support platforms that makes it easier to understand the software better
PaintShop Pro has over 90 filters that are highly creative and innovative that can be used to enhance the image texture and colour and make it look filled with life
Compatible with image files such as JPG, RAW, TIFF, GIF, PNG, PSD and PDF
10. Corel PhotoImpact
Corel PhotoImpact software offers a highly user-friendly interface that can be easily navigated and supports a fully-featured photo editor along with an inspiring set of photo projects and digital art that enables users to make digital photography and image creativity a fun, fast and easy task not only for the professionals but also for beginners in the field. It has an Easy and Fast ExpressFix Mode that enables automated enhancements that are easy-to-understand. It helps to put the tools you need at your fingertips while you are using this software. Corel PhotoImpact is the ideal for all the novice computer users.
Key Features:
ExpressFix or Full Edit mode that is used for editing photos and creating the best version of the photo in a jiffy.
The ExpressFix mode also provides the users with the option to adjust colour, exposure, skin tone and focus with the click of a button.
The Full Edit option also has editing options such as portrait touch-ups, enhancements and effects.
PhotoImpact has perfectly combined both the basic and advanced tools into one quick mode to endure easy and comfortable use.
It is compatible with 32 different photo file formats including- RAW, TIFF, JPG, GIF, PNG, PSD and animated GIFs.
Conclusion
In this article, we have listed the top 10 software for royalty-free images as an addition to the best free photo editing software for PC. Now you may try them one by one until you find the best image software for yourself. In case you just need to remove unwanted parts from a photo, you may have a try with Gihosoft Photo Eraser. Don’t forget to share us your favourite choice in the comment.
In many cases, we need to share files online without using common methods like email or social networking tools. For example, you may want to anonymously send a file to a stranger without adding him/her as a contact in Facebook or WhatsApp, or you may have to share file too large to be supported by regular means. Well, that’s where online file sharing services come in. These file sharing platforms offer you plenty of storage for free and provide abundant features. And the biggest advantage of using online file sharing sites is that your files can be shared with anyone securely via a download link. Here is a selection of the top 16 best free file sharing sites for your needs.
Bonus Tip:
Whenever you lost important photos, videos or documents mistakenly or accidentally, don’t hesitate to try a free data recovery software to get them back from computer, external hard drive, SD card or pen drive.
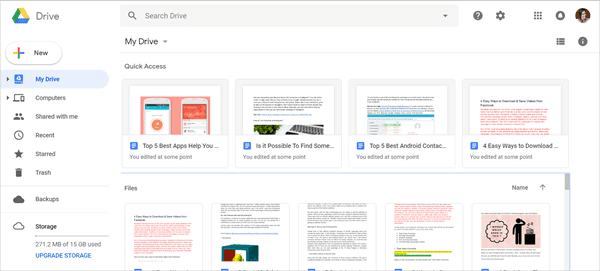
Google Drive is one of the best free file sharing sites that allows you to share any files instantly. You can upload any kind of file, ranging from documents, spreadsheets, PDFs, photos, videos, etc. and send the shared link to the receiver. This online file sharing tool offers users free 15GB space which can be upgraded later with a nominal fee.
Benefits of Google Drive:
The uploaded content is shareable with anyone by inputting the recipient’s email address and the access link will be delivered to their email address.
Shares high-quality photos and large documents with anyone and they’ll be able to access them anytime.
Allows users to edit, modify, and control permission of the files by making them public or private.
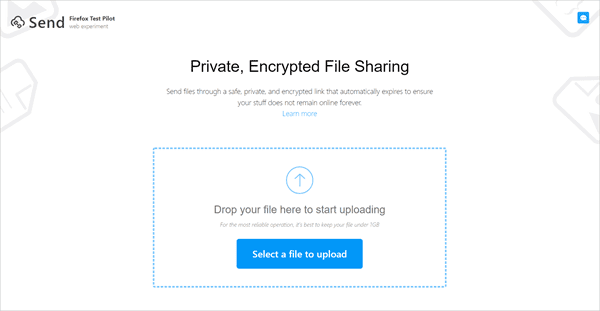
2. FireFox Send
FireFox Send is another free file sharing website launched by Mozilla Firefox. It lets you upload and send large files up to 1GB through a safe, private and encrypted link. Each link created by Send will automatically expire after 1 download or 24 hours, and all files uploaded will be automatically deleted from the server.
Benefits of Firefox Send:
Does not require an add-on or registering an account, and can be used in many modern browser.
Supports uploading files via dragging and dropping.
User can enable password-protected downloading and set downloading times of files on sharing page, which fully guarantees security and privacy of files.
3.PlusTransfer
PlusTransfer is one of the simplest file sharing tools to share large files free online. It does not need any registration or user account for file transfer. All you need to do is open the online uploader and click the big + button, select a file, and enter the email addresses then hit send.
Benefits of PlusTransfer:
No software installation is required.
The service is 100% free and you can send up to 5GB data for free.
Simple and interactive interface makes it easier to share large files, no technical knowledge needed.
4. SendThisFile
SendThisFile is another popular online file sharing method of sending and receiving large files to and from anyone, anywhere. This web based platform makes it easier to send large files securely with a share link and an email plugin. It is free to share files to your friends or family, but the file size is limited to 2GB.
Benefits of SendThisFile:
Uses 128-bit encryption for secure file sharing online.
There is no need to install any application to use this online file sharing tool.
5. Ge.tt
Ge.tt is another simple online file sharing method to share files without signing up for a account. This tool makes file sharing very easy, you can simply drag and drop file onto this platform. And you can even upload multiple files at one time. You can get 2GB free storage space by signing up. If you activate the premium account, you will get much more storage space and file size capability.
Benefits of Ge.tt:
Provides you the option to share the uploaded file directly on Facebook, Twitter, Google+ and other social networks.
Protects your privacy, the uploaded files will get deleted automatically in 30 days.
The realtime tallying function helps the sharer to find out how many people downloaded the shared file.
6. Files2U
Files2U is one of the best web service that can solve your online file sharing needs without worry about the restrictions of email or slowdowns of FTP. This web uploader has a straightforward interface to help you share large files with others. Just enter a couple of email addresses, your name, select the files you want to share, and hit the upload button.
Benefits of Files2U:
No registration required to use this online file sharing service.
Secures the shared file by sending a pin number to the recipient which can be used to unlock the file.
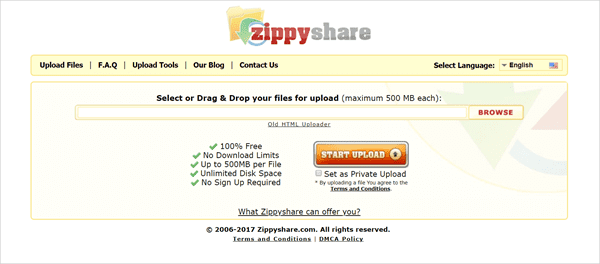
7. Zippyshare
Zippyshare is a free file sharing website that allows you to share large files up to 500MB. You can select files or directly drag & drop your files for uploading and sharing. Then the uploaded files can be easily share with a link via email, message, social media, websites, forums or any other media as you like.
Benefits of Zippyshare:
100% free to use and contains no download restrictions.
Offers unlimited disk space and doesn’t require signing up or installing software.
Gives you the option to upload files in private mode in case you do not want it to be visible to all.
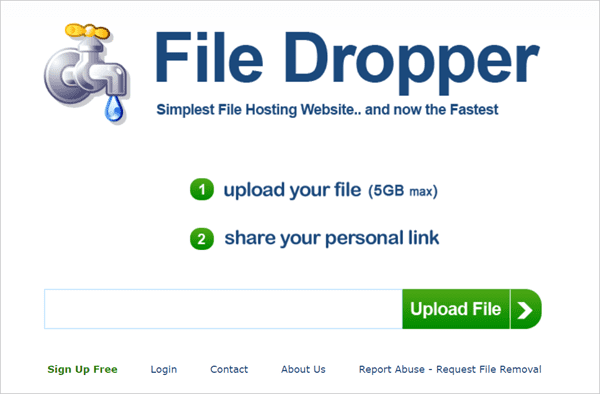
8. File Dropper
File Dropper is one of the simplest and most convenient free file sharing tools currently on the market. This web uploader comes with clean interface. You just need to upload the file you want to share, click on the share link and the work is done. It allows you to upload any file type of up to 5GB and stores your files as long as they are being downloaded.
Benefits of File Dropper:
Provides you an embed code to share the uploaded file on websites and forums.
The premium plan of File Dropper even offers you up to 250GB storage space.
We Transfer is probably another very awesome file transfer software which is having pretty decent features for its users. The protocol which this File transfer software follows is very much secured, which makes it a popular choice among all the users. The overall interface of this software is also very well developed by its developers. That’s why millions of users use We transfer software on their devices to transfer files with ease. There are some fewer limitations of this software which includes No password protection protocol and limited storage time etc. But using We Transfer software, you can transfer data of almost 2 GB in one go without any particular file size limitation. All you need to do is to enter the Email address of both recipients and yourself to start the file transfer process. Once you fill up all the required fields successfully, you will see that file transfer will be done in some fewer seconds. The best part of this software is that there is no need for a registration process in this file transfer software. Just select the files which you want to transfer and fill up the Email addresses to successfully transfer the required data. We Transfer is open-source software, which means that every user will be able to use it for free without any charge. The maximum file size which you can transfer using this software is 2GB. So, remember all these points and share files with your friends quickly and hassle-free.
This file-sharing tool is another very excellent choice for the users, which is pretty much popular among the users from all over the world. There are so many highlighting features about this software which are just incredible and almost every user will like them for sure.
As like We Transfer software, Mail Big File software also allows its users to transfer a maximum of 2GB data at once. Moreover, this software only allows you to attach a maximum of 5 files at once, which is not a very good feature for the users. But the main advantage of using this software is that the files which have been uploaded on the server of this software will be available for downloading for ten days. So, users can easily download the uploaded files in 10 days after being uploaded on the server.
There is no such need of registration process on this software, which makes it an ideal choice for the users. The graphic user-interface of this software is very well-developed and managed by its brilliant developers. The encryption technology used in this software is the latest one, and this is probably the main reason why users use this software on a massive scale. This software is open-source software that every user can use in their device for free.
Media Fire is another incredible choice for the users, which is a cloud-based file transfer software.Any user who have that URL can access the files which have been shared by any sender. After registering on this software for the first time, you will get a free 10GB space on this software which can be further upgraded to 50GB by paying some subscription charges.
Furthermore, there is no such restriction of downloading files from this software, which is probably the most important feature. As a sender, you can share the URL of the uploaded files to an unlimited number of users. That’s why Media Fire software has been considered as a premium file transfer software, which is a cloud-based file transfer system. Privacy protection is another very important feature of this cloud based file transfer software which will ensure that no one can access your important files suspiciously. The subscription charges of the premium storage account are not very high, which makes it an ideal choice as a good file transfer software. So, getting switched to this software for file transfer task is not a bad idea at all for sure.
This software is yet another very suitable file transfer software for the users, which is developed with most of the optimized features. Like the MediaFire software which works on the sharing of the URL or link of the shared file, File Dropper software also works on the same algorithm. All you need to do is to register yourself on this software to get started with it. After the registration process is done, you will get a free 2GB permanent storage space on this software.
Moreover, the upgraded features of this software will allow you to upload a file of a maximum 5GB, unlike the other software packages, which is having a maximum limit of 2GB. The overall total storage period of the files which is uploaded on this software will last for almost 30 days, and after the end of this period, the files will automatically get deleted. The only downside of this software is that it does not offer the feature of sharing files with some specific people.
That’s why every time you upload a file, you will get a URL from this software which you have to share with your friends individually. As we already mentioned, most of the features of this software are well optimized by the developers, which makes this software a complete and ideal choice as a file-sharing tool for the users.
JumboMail is another very best kind of file sharing tool for users. JumboMail file sharing tool will allow you to share files of a maximum of 2GB in size even without doing the registration process. The overall bandwidth of file sharing on this software can be increased by sharing this software with your friends and family members. After a successful invitation, the limit will be increased from 2GB to 5GB. Now, that is surely a massive advantage for the users because there are fewer software packages which offer high storage space to their users for free.
The uploaded files on JumboMail software will last long for about 7 odd days, and after that, those files will be automatically deleted. The easy to use graphic user-interface of this software is something which cannot be ignored. The developers are optimizing the overall functionality and file transfer speeds on this software to maximum levels so as to ensure user satisfaction. The password protection feature will soon become available for the users, which will boost up the performance of this software for sure. So, JumboMail is a good kind of file transfer software which is having pretty decent features and functionality as well.
Another prevalent file transfer software for the users which is certainly having some excellent stuff in it. The best and the only advantage of using this software is that there is no need of registering yourself on this software to get started with the sharing of files. Multiple files can be sent to the users up to a maximum file size of 1GB, and the maximum file limit is set to 10. However, files can only be shared with a maximum of 5 recipients, and this is probably the only downside of this software.
However, the total number of days in which you can download the files which has been shared is set to 7 days. So, that’s why it is a decent option which can be considered on this list. And as we already mentioned, there is no such need to register yourself on this software to get started. Only launch this software on your PC followed by selecting files and entering the recipient’s address will do your job. The overall graphic user-interface of this app is also pretty much appealing for the users, which makes it a perfect and decent choice. This software also makes sure that the shared data on this platform must be having all the security measures to prevent data privacy. So, overall Files to Friends is a decent kind of file-sharing software which is having decent features to entertain its users.
TeraShare is surely the most incredible choice which you will get in this list of top file-sharing software. TeraShare is a combination of the P2P file-sharing system and cloud storage. However, to establish the P2P connection between two devices, you need to install a third-party application on your device, which this software will automatically guide you. The downloading of the shared file at the receiver end will start immediately once the file is shared from the sender’s end. This is probably the most attractive feature of this software, which is very good for the users. Moreover, if the total size of the files is less than 10 GB, then that file will be automatically saved to the cloud from where the receiver can download anytime they want to. Furthermore, files can be shared with as many numbers of users as you want to.
There is no such restriction of sharing for the users. So, these were some advantages of this software, which makes it a class apart software for the users. Though the interface of this app is not so attractive and developed, still the overall performance and features are excellent in our perspective. You have to install a small size application on your device to use this software to its maximum efficiency. The sharing process is online and via Email. So, use this software if you have liked all these features. We strongly recommend this software to our users because it is used on a massive scale by other users, which makes it a popular choice for all. The overall installation size of this software is also not too high, which will make the sharing of files a hassle-free process.
Last but not the least, Transfernow is yet another very awesome kind of file sharing tool for the users, which is very much efficient in terms of performance. All you have to do is to create your free account on this software to start sharing files. Users will experience some new features in this software once they register themselves on this software. Creating a legal account on this software is free for all users. Users can also share files as a guest in which they won’t be able to experience the premium features of this software. Furthermore, there is no restriction on several recipients and a total number of files as well. So, this is probably another very good reason why you will opt-out for this software.
Talking about the downsides of this software, then the first point which should be considered is that you have to register on this software to claim your free 3GB storage space. Another downside of this file-sharing tool is that the uploaded files on this software will remain on the server for 15 days for downloading purposes. So, these were some pros and cons of this software file sharing tool which needs to be considered before indulging yourself with this software.
Conclusion
So, here is the list of top 16 best free online file sharing websites and tools that helps you share large files instantly. Note that the speed of file sharing solely depends on the internet speed of yours and the one who is receiving. Still looking for a way to send your huge files? Go use these services to take advantage of hassle free file sharing. If you find this article helpful, don’t forget to share it with your friends and family. If you know any other free file sharing site, just write it down in the comments section below.
“I have accidentally deleted some photos from both my internal and external hard drive using shift + delete keys. I am using Windows 11. Recycle Bin is not showing the deleted files. Is there a way I can recover them?”
Hard drive is absolutely the best choice when it comes to storing massive data, such as photos and videos. However, it is not common that people would use an extra storage device to back up the entire hard drive data, which means there is usually no backup when photos are permanently deleted from an internal or external hard. Fortunately, there is free way to recover deleted photos from hard drive. Keep reading if you want to know how to apply an 100% free hard drive photo recovery.
The Best Free Hard Drive Photo Recovery Software
What happens when you delete a photo or document from a hard drive? Actually, the system only marks the space occupied by the deleted data as available for overwriting, which means new files can be stored there. However, before the overwriting happens, it is still possible to recover deleted photos from hard drive with the help of a good recovery software.
RePicvid is a 100% free photo recovery software for hard drive, pen drive, SD card, and more storage devices. In addition to hard drive photo recovery, you can also experience the premium features and retrieve deleted video and audio files from internal/external hard drives as well as other kinds of storage devices.
Recover over 100 types of files, including photos, videos and music. To recover more files, like documents, upgrade to RePicvid Standard.
Recover deleted photos from hard drive as well as SD card, pen drive, and computer.
Full preview for all files before recovery.
Advanced Scanning to specify the data type you need to restore.
High recovery rate with original quality.
Free download the hard drive photo recovery software, install it on your Windows or Mac computer, and then follow the steps below to get back your lost pictures from hard drive.
3 Steps to Recover Deleted Photos from Internal/External Hard Drive
If you didn’t find the deleted photos in Recycle Bin, RePicvid Free Photo Recovery is the best solution you can try. This freeware allows you to recover lost photos/videos/music from internal/external HHD or SSD due to accidental deletion, disk formatting, virus infection, etc.
Note: To avoid photos being overwritten, you should stop using the hard drive disk for storing or creating new files. Besides, please close the other running programs on computer in case they produce new data on the HDD.
Step 1: Select the Internal/External Hard Drive Where Photos Were Deleted
Install and open RePicvid Photo Recovery Freeware. Click on the first option and connect your external hard drive to the computer. Select the external HDD (or Internal disk) where you lost pictures.
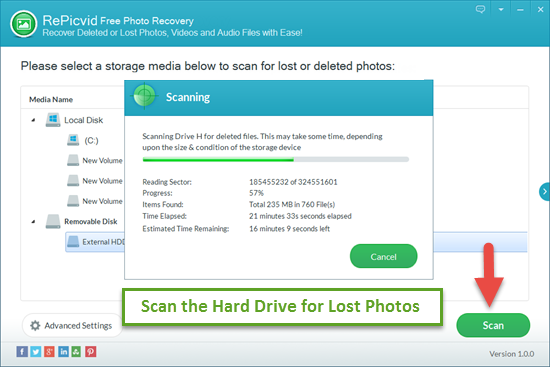
Step 2: Scan Lost Photos on Internal/External Hard Drive
Click the “Scan” button to get start. Before that, you can also to refine image types in “Advanced Settings” for faster scanning.
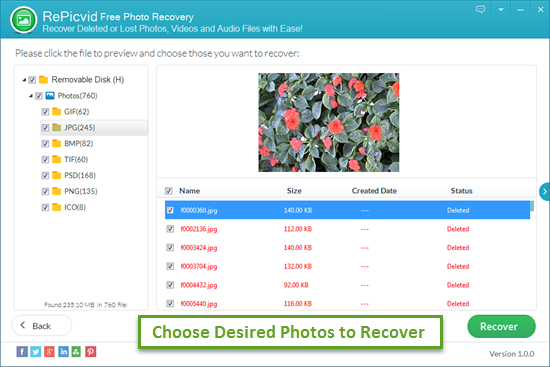
Step 3: Preview and Retrieve Deleted Photos from External/Internal Hard Drive
You can preview the recovered images before recovery. Select those you need and click the “Recover” button to save them onto another storage location. Finally, open the folder to check the deleted photos.
Bottom Line
How to recover deleted photos from external hard drive without software? Many people are not willing to pay for a recovery software, but what if the hard drive photo recovery program is free? Losing important files from hard drive is not a disaster as long as you take the necessary measures quickly. RePicvid has helped thousands of users restore pictures from hard drive for free. Don’t hesitate to give it a try in case you mistakenly deleted hard drive files. You don’t need to pay anything except for some time to undelete photos from hard drive.
SD cards are widely-used in mobile phones, digital cameras, and other electronic devices. However, most people learn the importance of backing up SD card in a hard way. As a result, many people need to recover deleted photos and videos from SD card after mistaken deletion, formatting or other accidents. Luckily, as long as the lost data has not been overwritten by new ones, there is a chance to undelete photos, videos and other files for free with the help of the top free SD card recovery software listed below.
Why You Need a FREE SD Card Recovery Software
Though it is possible to retrieve lost files from an SD card, most people are unable to do it manually. SD card recovery tools developed by technical teams or companies are more efficient for the very task. Data recovery laboratories are surely capable of detecting and fixing the issue, but the cost is usually not affordable for individuals. Hence, it is a wise and reasonable choice to seek for the best free SD card recovery software.
The top SD card recovery apps in this article are free or partially free but with premium and paid features, which should not be ignored. Actually, sometimes only those advanced programs can find your lost files. Moreover, all of the recovery tools in this article will allow you to preview the found data so that you know what can be recovered and which cannot.
We have prepared 5 Best Free SD Card Recovery Software for your ease. Check them and choose the best that suits you:
Gihosoft RePicvid is a rising name in the data recovery industry which has won the trust and satisfaction of millions of users. It comes with various editions and the Standard version provides the maximum possibility of SD card data recovery. You can use it to scan your SanDisk, Kingston or any other SD memory card for lost photos, videos, audio, Office documents, etc. hassle-free.
RePicvid SD Card Recovery Software is available for free download on Windows and Mac computers and supports SD cards running on FAT32 and exFAT as well as devices on NTFS and other file systems. It is featured with a straightforward and intuitive interface, so you will get back lost files in several steps.
Step 1. Connect the SD card to computer via a card reader or the slot on PC.
Step 2. Run RePicvid Standard and select the file type for recovery.
Step 3. Scan the SD card partition for lost data.
Step 4. Preview the found data and click the Recover button to save them.
Pros
It allows retrieving the lost data from USB drive, SD card, hard drive and so on.
The Advanced Settings enable fast and efficient scanning.
100% free for SD card photo recovery.
It is risk-free, powerful and reliable.
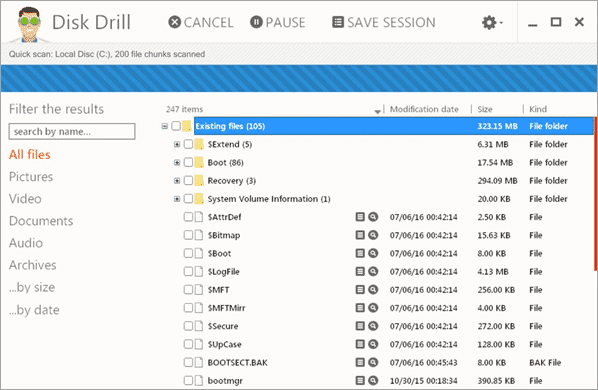
Top 2. DiskDrill (500MB Free Recovery)
Sometimes, we delete the data from the drive and also clean the Recycle Bin. If this thing happened to you, then this software is very helpful in this case. DiskDrill is very easy to operate. Select the drive from which you want to recover the data with a deep scan or quick scan. Go for deep scan option if you want to recover more file. Although a quick scan takes less time for scanning, it may be unable to find the lost data you want to recover.
Pros
Both deep scan and quick scan are available.
The deep scanning takes comparatively less time.
Offers free data recovery within 500MB.
Cons
Quick scanning won’t find too much valid data.
It is not easy to locate the wanted data from all the entries.
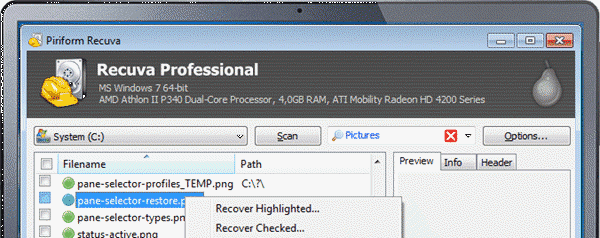
Top 3. Recuva (for Windows Only)
Recuva is another popular SD card data recovery software. It is easy to use and manage. Launch the Recuva, and select the advanced mode. Select the options. A dialogue box will appear, choose the Action Tab. Select Scan and then press OK. Do wait until the Recuva scan completes. Save your file in particular folder after the scanning process.
Pros
Recuva has both Free version and Professional version.
Quite efficient in JPEG photo recovery.
Cons
The interface is not friendly for newbies.
Recuva only works on the Windows, not on Mac.
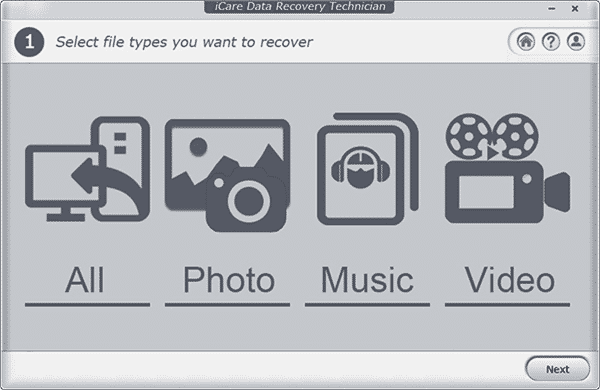
Top 4. iCare Data Recovery
If you are in search of a free SD Card Recovery Software that only works on the Windows operating system, then you must try iCare Data Recovery. It provides various editions for users, and users can at least recover 1GB files free.
Launch the iCare and select the recovery mode from “Deleted File Recovery” and “Advanced File Recovery”. Choose the storage media to start the scanning process. Wait for the scanning process to complete. Preview the lost data, choose the files that you want to save. Save the files in your desired folder.
Pros
iCare offers up to 1GB of free data recovery from SD card and other storage media.
It works well for all types of data except jpeg.
It is very easy to use.
Cons
iCare only operates on Windows, not on Mac.
The scanning really takes a long time.
Top 5. PhotoRec Data Recovery (Free Yet Complicated)
PhotoRec is one of best SD card recovery freeware that recover all types of files. It is 100% free for SD card data recovery, but operating this software itself is a difficult task. It will take users a lot of time to get the hang on it. If you’re a tech savvy, then PhotoRec is absolutely a good choice. Otherwise, it is the last free SD card recovery software that we would recommend.
Pros
It is free and recovers all types of files
It supports all storage media such as hard drive, USB flash and SD card.
PhotoRec versions are supportive on Mac, Windows, and Linux Operating System.
Cons
PhotoRec uses the command line interface that is very difficult to operate especially for the new users.
It is somehow technical so a wrong command entry can lead to data corruption or data loss.
Conclusion
In this article, we have gone through all the 5 best SD card recovery freeware. It is impossible to name the best SD card recovery software that suits everyone, but we have tried ranking them in a reasonable order, so you can pick one by one to see if your lost SD card files can be found or not. Nevertheless, RePicvid is strongly suggested for restoring deleted photos and videos from Nikon camera for free. Kindly share your experience, suggestion or problem with us in the comment.
Where do deleted files go after Recycle Bin? Is a deleted file really gone? Does the Recycle Bin include everything deleted from hard drives? Is it possible to restore permanently deleted files from Recycle Bin in Windows 10/11 after empty? Keep reading to get answers to the questions.
It is easy to restore deleted files from Recycle bin after you delete them. However, what if you emptied the Recycle Bin? Besides, the Recycle Bin only stores files removed from the internal hard drive of a computer for a certain period, not including external hard drives and removable disks. Is there a way to restore permanently deleted data from Windows & Mac?
As a matter of fact, deleted files are not actually disappeared forever. They are just hidden momentarily until being overwritten. So remember not to save or change anything in disk after emptying recycle bin. The faster you take measures, the more files you could recover. Here are two solutions about how to recover permanently deleted files from recycle bin after empty.
How to Recover Files from Recycle Bin in Windows & Mac
Recycle bin in Windows, or Trash in macOS, is somewhere the operating system stores the files you deleted from the computer local disk. Yes, unlike smart phones, you can remove files from a computer without worries as it is easy to recover deleted files from Recycle bin or Trash in most cases.
Restore from Recycle bin in Windows:
Step 1. Open Recycle bin.
Step 2. Locate the file or folder you want to recover.
Step 3. Right-click on the file or folder, then choose Restore.
Now the file or folder shall be restored to its original location.
Note: Make sure you know the original location of the file or folder, otherwise it may take you a long time to find the recovered file. If you forget the location, please choose Properties on Step 3, and you will see the original folder (instead of the full path) of the file.
Restore from Trash in macOS
Step 1. Open Trash on your desktop.
Step 2. Right-click on the file or folder you want to restore, then choose Put Back.
It’s worth mentioning that external drives have their own Trash in Mac. If you deleted files from a pen drive in your Mac, which are not moved to the Trash of your desktop, you might be able to find them as hidden files.
Enable hidden files in macOS Sierra or later: Press “Shift + CMD + .” shortcut, then check the “.Trashes” folder in your external drive.
How to Permanently Deleted Files from Recycle Bin after Empty
However, you may not find the files you need in Recycle bin or Trash in some cases:
Empty the whole Recycle bin or delete files/folders from the Recycle bin
File/Folder too big to be recycled
Delete files from a USB device connected to a Windows computer
When you cannot find a deleted file in Recycle bin, it might have been permanently deleted, or so thought as the operating system and most people. As a matter fact, as long as the deleted files have not yet been overwritten by new data, it is still possible to restore data from Recycle bin after empty or under other occasions. To recover permanently deleted files, you will need a good data recovery software.
RePicvid Free Data Recovery is capable of recovering permanently deleted files from emptied recycle bin. With it, you can undelete photos, videos, audios, Office documents and compressed files from computer hard drive, USB flash disk and memory card. What’s best, this Recycle bin file recovery software will help you recover photos 100% for free. Follow the guide below to start restoring files from recycle bin.
Step 1. Select All File Types and Hard Drive Where Deleted Files Are
Run RePicvid and choose All. Then select a local disk where you delete files before emptying recycle bin.
Step 2. Scan and Preview Deleted Files in Recycle Bin
Click Advanced Settings and select format of files, which will reduce scope and time of scanning. Then press Scan to start reading all deleted files in the disk you choose. After scanning finishes, preview deleted files.
Step 3. Recover and Save Deleted Files in Recycle Bin
Choose deleted files you need to recover and save them to another drive or an external storage device. Just in case, it will warn you if you save them to the same disk.
How to Restore Permanently Deleted Files from Recycle Bin without Software
If you have created a backup before, it is feasible to recover deleted files from recycle bin without software. The backup comes from restore point or Windows backup. You may restore deleted files by returning it to previous versions. Do as following steps:
Select a folder where deleted files are, and right click it.
Choose Restore to previous version.
Normally the restore button is not available if you don’t use Windows backup or it won’t show any old version there. Anyway, the existence of Restore point enables users a proper method to back up Windows computer and files stored. A similar mechanism is also available in macOS.
How to Show the Hidden Icon of Recycle Bin
There may be occasions when you accidentally hide the recycle bin, not delete the files. You could restore the hidden recycle bin with solution below (take Win 7 system as an example):
Right click the desktop and select Personalize.
In the left panel, click Change desktop icon and tick recycle bin from a pop-up window. Then click OK to confirm.
After that, your deleted recycle bin would show on desktop again.
Verdict
In this tutorial, we have learnt several ways to recover deleted files from Recycle bin which shall be applied under different conditions. In case data loss happens to you, don’t hesitate to choose a solution of Recycle bin recovery according to your situation as soon as possible. Feel free to share your experience or opinions in the comment.
Many people are looking for an effective method to back up their data before they format a laptop for desktop computer. The challenges include but not limited to the choice of storage space and location, how to separate important files from useless or unnecessary ones, what’s the most efficient method to back up a computer. If you’re having these worries, keep reading the following content to get some ideas. You will also learn a way to restore lost photos 100% free in case there is no valid backup.
Tips: To maximize the security of your files, you are suggested to backup your Windows according to this 3-2-1 rule: make 3 copies of the important data, backup the data to 2 different kinds of devices, and keep 1 offline copy.
Part 1: How to Backup Windows PC to External Hard Drive
① Built-in Windows Backup Functions
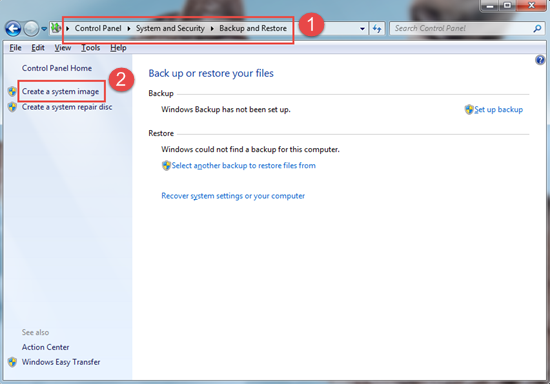
Windows offers several built-in features to backup your computer data. You can backup a Windows PC by creating a system image by going to the following path: Start > Control Panel > System and Maintenance > Backup and Restore > Create a system image. System image could store all of your files, settings and other info on Windows, but restoring individual files from it is not supported.
Note: Backup and Restore is a feature popular in Windows 7 but also compatible in Windows 10/11. In Windows 10/11, you can find the new Backup option in Settings, which allows you to back up important files to external hard drives.
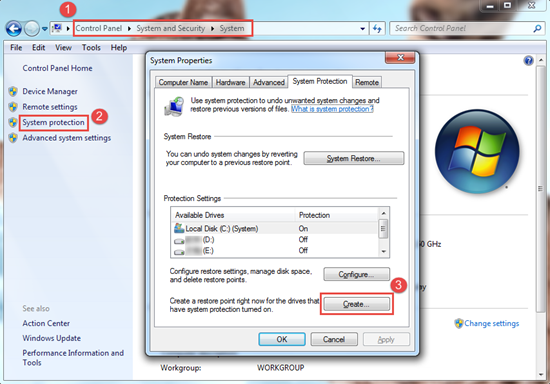
In addition, you can use another fantastic function – restore point, which allows you to restore your files to a previous version before data loss happens. The operation to make a restore point is also very simple. First, open the System Protection tab by navigating to Start > Control Panel > System and Maintenance > System > System Protection. Then click the Create button and enter a description of your restore point.
② Backup Windows to External Hard Drive
Compared with the first method, backing up your Windows PC to an external hard drive is much safer because the backup file can still work even if your computer is not accessible.
Plug your external hard drive to computer via USB cable.
Tap on Start button. Then open Control Panel and click System and Maintenance.
In System and Maintenance window, select Backup and Restore.
Click Set Up Backup button, and choose your external hard drive in next interface.
Finish the rest settings following the guidance and hit Save Settings and Run Backup on final screen.
The two options in this part really work, but you will have to do regular backups and necessary maintenance to make them more efficient and effective. If you prefer the one-click solution, which presents multiple options for your decision, then you may try the top 5 backup software for Windows 11/10/8/7 PC.
Part 2: Top 5 Backup Software for Windows Computer
When it comes to backing up Windows PC, a free Windows backup software may be the first choice for most users. Here we would like to share some commonly used ones in 2022, including local software which are strong and safe as well as cloud service which are more convenient for cross-device users.
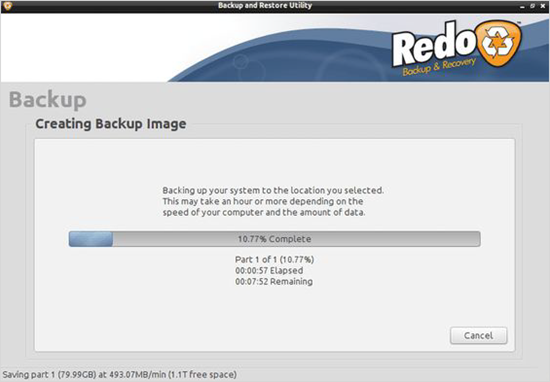
1. Redo Backup
If you plan to backup a whole hard drive, then do not miss Redo Backup. It is able to backup your hard drive to an internal/external hard drive, FTP server, or even a shared network folder. However, it doesn’t support backing up individual folders and you are not allowed to read the backup file.
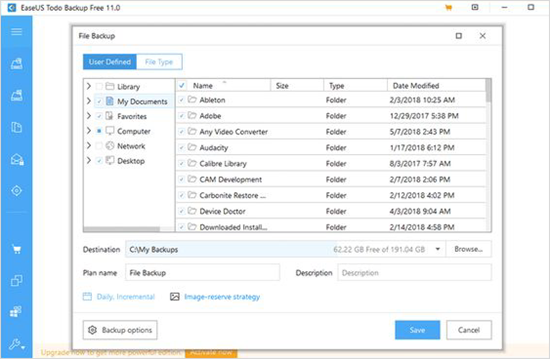
2. EaseUS Todo Backup
EaseUS Todo Backup could backup a individual file or an entire folder. Besides common local drive and network folder, it also enables users to backup Windows computer to a free cloud storage server.
Note: Backup files created by EaseUS Todo Backup cannot be read through Explorer, either. But you can check them with this backup program.
AOMEI brings both the free as well as paid backing up plans which you can access. It is easy to get a complete hold on the things in which you are backing up with a backup option on windows. For the proper backup of folders or files, you have to click on the required data, and rest will be done. There is a scheduled backup which you can put for regular backups. You can use external storage; it gets easier to recover the files after PC failure.
For the trial part, the free version will grant you access to backup and restore the data. However, with a complete version, you will be able to get a system clone, backup image, disk space management, and command-line backup. There is another version with the name server version which grants you backing up of data from the data servers.
Key Features: Free version with full backup options, complete control over backup & restore. Easy ways of creating an entire system clone. Pricing: Free version brings limited yet the best option. A Professional version can cost $49.95 for a lifetime for two PCs. Compatibility: Works well with Windows 10, 8.1, 8, 7, XP
Google Drive is one of those popular storage services which you can’t resist having for your backup purpose. They have made the task of backing up this easy that you have to sign in using Google Account and select what you want to backup. A user can Sync your backup with Google Drive, making it easy to use anytime.
There is a storage space of 15GB which comes free and can be expanded for $1.99/month bringing you extra 100 GB of storage space. If you want to have higher storage space, it can be done at $299.99/month for 1TB.
Key Features: 15 GB of storage space for free of cost and integrated Google services. Pricing: Free storage of 15 GB and 100 GB of storage at $1.99 Compatibility: Windows, Mac
Dropbox is one of the most popular uses of cloud storage service, which brings around 2 GB of free storage. It depends on user choice if anyone is willing to extend the storage space to 18 GB by merely referring the software to other people. The software also brings the option of getting 1 TB of space at $8.25/month and at $20 you can get unlimited storage. It is dropbox which can save your trouble of losing data due to a corrupt file or other causes by creating easy backup options.
The software works with most of the windows, web, Linux, Android, iOS, and MAC.
Key Features: Simple to use and unlimited storage option. Pricing: 2GB free storage space and unlimited storage at $20. Compatibility: Works well with Web, Windows, Mac, Linux, Android, iOS
Which Cloud Service to Choose for Windows PC Backup?
There are hundreds or thousands of cloud services in the market, but it is wiser to choose the most reliable ones to keep your data secure and safe. Furthermore, it is more possible for cloud service providers to lower the charging rate when they have many users and several competitors.
Dropbox and Google Drive are 2 other famous Cloud services to back up your Windows PC. Dropbox offers only 2 GB free storage, but you can extend it to 1 TB for $9.99 per month. Google Drive offers 4 plans: 15 GB for free, 100 GB for $2 per month, 1 TB for $10 per month, or 10 TB for $100 per month. You can choose the proper one according to your demand.
For Windows users, OneDrive is another ideal choice among various cloud storage servers. It offers a free storage of 5 GB and you can expand the storage to 50 GB for $2 per month or 1 TB with an Office 365 Personal plan for $7 per month.
Part 3: How to Recover Photos from Windows 100% Free without Backup
What if your files like memorable photos, videos or audios stored on Windows get lost before you can back them up? Do not worry. You still have chance to restore the deleted photos, audios or videos.
Step 1: Stop creating new files to your PC, especially to the disk where you lost files. Or the deleted files will be overwritten and become unrecoverable.
Step 2: Install and launch RePicvid, which is the best software to recover lost images (free), audio and video files from computer, external hard drive, memory card, etc.
Step 3: Select the drive on which your lost files were stored and scan it for your deleted photos/audios/videos.
Step 4: When the scanning is completed, preview the recoverable files and recover those you want.
![[2022] How to Recover Corrupted SD Card without Formatting](https://www.gihosoft.com/wp-content/uploads/2019/10/how-to-recover-corrupted-sd-card.png)